The Ten Commandments of Mural Painting
Why paint murals outside? It’s fun, challenging, activates your problem solving brain, and gives you the kind of public interaction, instant feedback, and visibility that painting by yourself in your garage can’t.
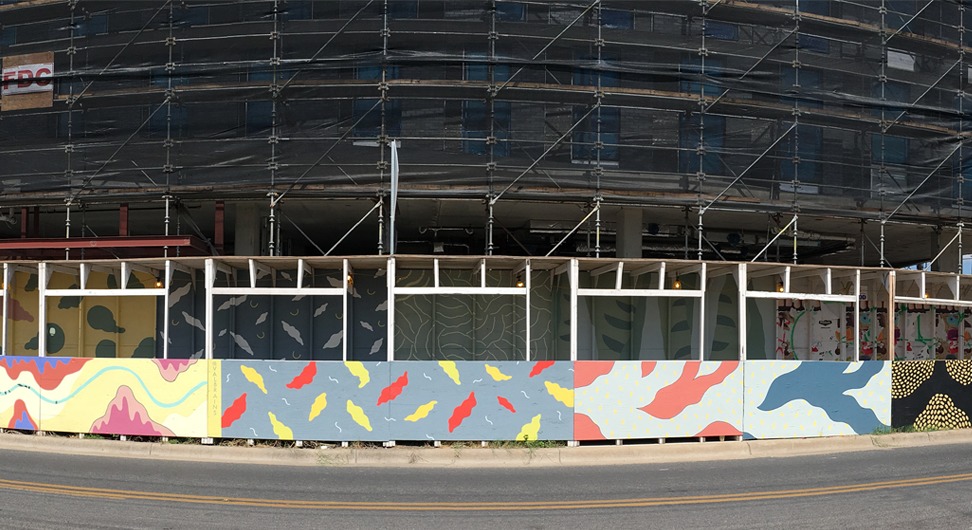
I’ve been painting a bunch at what has become a favorite construction walkway in Austin and have picked up a lot of tips and tricks (the hard way) in the process. Looking to share them with you the easy way. Behold, the 10 Commandments of Mural Painting!
1. PAINT WITH PERMISSION
When painting in public, you are a representative of the larger creative community. Whether you want this responsibility or not, it becomes yours once you paint (or do anything else creative) publicly. Make sure you’re clear on the rules and regs of the site and surface you want to paint. You can always find the owner, property manager, foreman, etc. and get explicit permission and parameters.
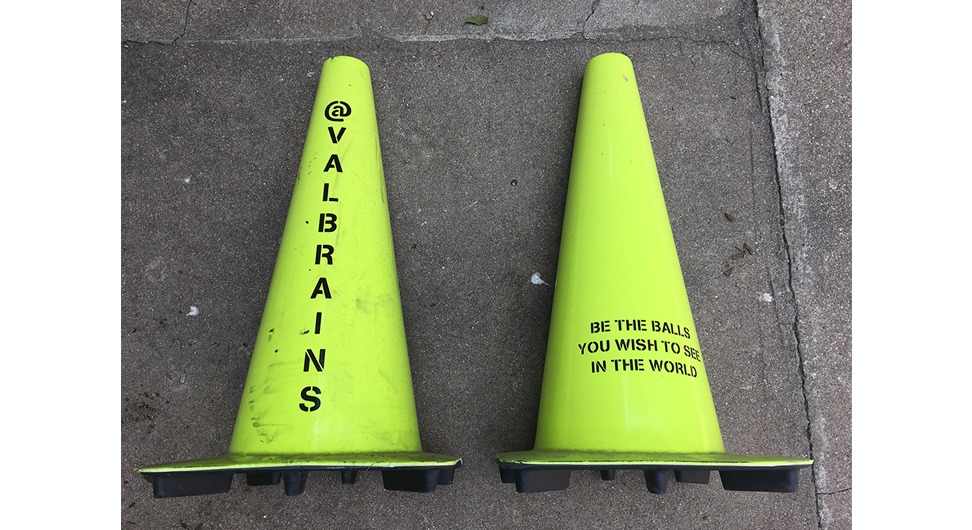
While we’re on the topic of permission, give yourself permission to remain alive by investing in some safety gear, like a neon vest and traffic cones. Sounds cheesy but staying visible is key, particularly if you’re painting near or in the street. Your local DOT will have regulations for things like safety cone color and height listed deep within the bowels of their website (I recommend calling to be directed to the right webpage). Also, custom traffic cones are a fun and ridiculous way to advertise your instagram handle:
2. LIMIT YOUR COLOR PALETTE
If I have to encounter another mural with every color in the universe in it, my eyes will fall out of my head. Please spare me this unpleasantry and reign in your color palette before you even begin. I try to have a maximum of 5 gallon paint cans with me at any given time, plus a random assortment of quart or sample paint sizes to mix in to adjust the colors. But for real, 5 different gallons of colors to start with, MAX. Some benefits to limiting your palette:
- If you are mixing new colors from base of already limited colors, they are more likely to match in color and intensity
- If you paint your mural in different panels over time, using a consistent color palette as a foundation (even if you introduce splashes of new colors) will make the whole thing more cohesive
- You will suffer less paralysis of choice when choosing colors!
The minute you get too precious about choosing supplies, you stop taking creative risks because you’re afraid of ruining or wasting your fancy/expensive supplies.
3. ABC: ALWAYS BRING CARDBOARD
I know some people think ABC means “Always Be Closing,” but they’re either wrong or sales bros from the 90s. If I could legally marry cardboard, I might. It’s versatile, dependable, surprisingly rugged, and pleasantly unassuming. It can act as a paint drip catcher under a paint can, a portable color swatch to see if the color you want to put on top of the color you already did put on the wall will work, and a sidewalk guard that prevents you from accidentally painting the curb.

4. START WITH SHITTY BRUSHES AND SHITTY PAINT
Particularly if you’re just starting out, there’s no need for fancy materials. The minute you get too precious about choosing painting supplies, you stop taking creative risks because you’re afraid of ruining or wasting your fancy/expensive supplies. It is also precisely at this point that the work starts to suck.
I’ve been using latex house paint (mostly interior, shhhh) and cheap acrylic brushes in a variety of sizes. I probably wouldn’t use house paint on a more permanent surface like brick or concrete, but on a wooden construction walkway it’s just right. One “splurge” (it’s < $7) I would recommend is “The Master’s” Brush Cleaner and Preserver. It will help you suck all the life out of those cheap-ass brushes.
The sweet spot you’re looking for is materials that are just good enough for your painting surface and the intended longevity of your mural.
5. ALWAYS WAIT FOR THE PAINT TO DRY BEFORE COMMITTING TO THE COLOR
I learn this one over and over again even though my brain already knows it to be true. The actual color of paint when dry is often different than the color of the paint when it first goes on the surface. Sure, you can mark the outside of the can with a spot of color, but the feel is different when you’re covering a large area. Sun and shade can also play color tricks, so make sure to step back and see the big picture before making any permanent paint decisions. (Although, really, no paint decision is ever a permanent paint decision, as you can just paint over it. But you get what I mean.)
If I could legally marry cardboard, I might.
6. STEP BACK FREQUENTLY
Speaking of stepping back to see the big picture, make sure you’re stepping away from your painting regularly, especially when you’re doing detail work. It’s easy to get caught up in a small element of line or color and fail to see how it interacts with the rest of the piece before it’s too late and you have to redo. If you’re listening to music while you paint, use a song or three as a natural stopping point. I like to go across the street and make sure what I’m painting is working from a pedestrian or driver’s point of view.
7. BEGIN YOUR LOVE AFFAIR WITH CONTAINERS
Lord, how I love containers! It’s way easier to remember to bring everything that you need to bring if certain classes of items have specific designated places. For example, the smaller sample paints go together in a big black crate, clean/dry items that need to stay that way (like sketch paper, pens, extra rollers, cards and stickers, screwdriver and hammer, clean brushes etc.) are all in one cardboard box and the stuff that gets wet and disgusting goes in its own bucket. I even keep a “laminated” (with packing tape) list on the containers that I’m most likely to forget something in or forget to restock. Know thyself.
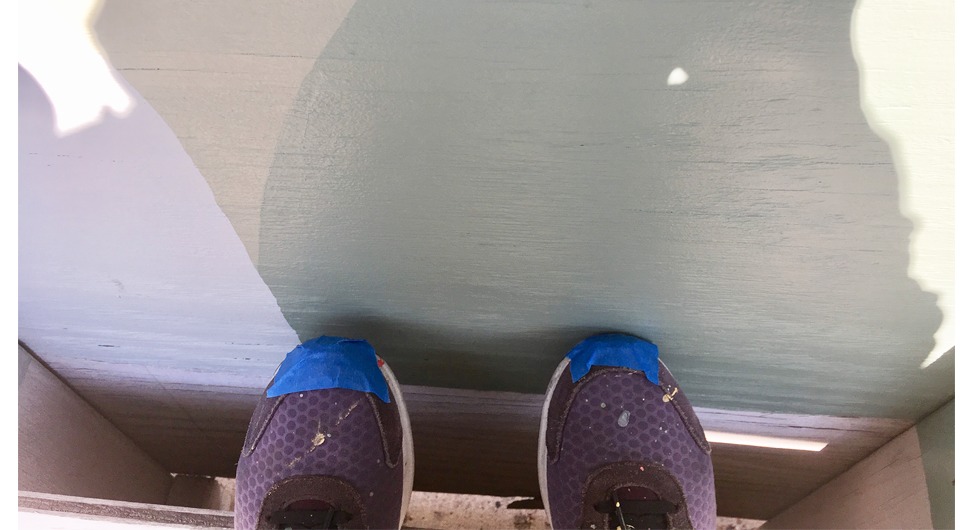
8. TAPE OFF THE FRONT OF YOUR SHOES
This one sounds weird but I promise it makes lots of sense in the field. I put a little piece of painter’s tape on the front of each shoe so my shoes don’t scuff the mural and I don’t have to repaint spots. “Why would you have your feet all up in your mural,” you ask? I find when doing detail work where lines have to be precise and/or fluid, I like to lean a foot or leg into the wall to steady my hand. When un-taped, that lean generally results in a shoe scuff that I have to cover later.
9. TREAT IT LIKE A JOB
If you don’t take your painting seriously, who will? (Spoiler: nobody) We have the modern technology: block out time in your calendar and don’t schedule on top if it or move it around (except for weather, fine). Commit to a time and get out there and paint!
10. PAINT FOR YOURSELF AND PAINT WHAT YOU WANT
The world has more than enough work produced to suit the whims and tastes of others. Seize the opportunity to paint something for yourself, from your perspective, with the elements that you enjoy, regardless of whether or not the public is yet ready for your jelly. Don’t look at what other people are producing or what seems to be of-the-moment — I checked with the universe and we have enough cutesy cacti and random wolf murals already.
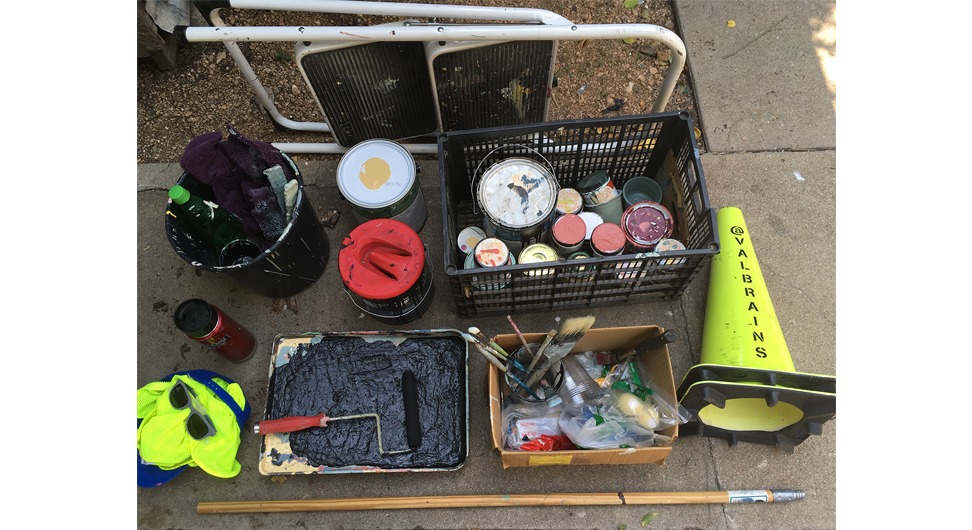
PAINTING PANTRY CHEAT SHEET
- paint gallons (but no more than 5 colors!)
- step stool
- safety cones
- hat
- safety vest
- sunglasses
- water
- paint tray
- paint roller handle
- paint roller extension stick
black crate:
- small containers of paint (for mixing or accent colors)
- cardboard (more in car)
bucket:
- water for brush washing
- rags
- paint mixing sticks
cardboard box:
- variety of brushes
- 1 quart plastic takeout container (to store brushes when they’re dry and hold water/brushes when they’re wet)
- extra plastic cups (for storing small amounts of paint, like when you’re working while up on the stepladder)
- screwdriver (to open paint cans)
- hammer (to close paint cans)
- business cards & stickers, bandaids, latex gloves (all in a plastic baggie to keep them clean/dry)
- painter’s tape, pen & paper, chapstick (in a different plastic baggie)
items not pictured (that are nonetheless very useful!):
- phone
- headphones
- bandana (or whatever you use to keep your hair out of your face)
- a snack
- sunscreen
- chalk (for “sketching” before you paint)
- foam kneeling pad
This work is licensed under a Creative Commons Attribution-ShareAlike 4.0 International License.